
Your musicYour performance
Practice with precision. Perform with freedom.
Stay tunedApp StoreYour music practice, organized. Keep each song as a project with its own saved progress, then practice, record, automate MIDI gear, and pick up exactly where you left off.
Save your practice state, switch between songs, and export or import projects across devices.
Set loops, slow the tempo, and transpose music without interrupting your practice.
With your compatible Core ML model, separate music into six stems and adjust individual instrument levels to create your ideal backing track. Learn more
Capture takes from an input device and shape the recording with built-in effects.
Use detected tempo, a metronome, and optional count-in clicks.
Every Song Is a Project
Your practice is never lost. Music Practice Mate manages each song as a separate project, preserving your practice state so you can return to any song without setting everything up again.
Return to your saved practice setup, including your work on loops and other song-specific settings.
Work on multiple songs and pick up where you left off instead of configuring each session from scratch.
Export a project and import it on another device to continue practicing there.
Move a project to another Mac
- Use the application's project export command to save a portable project.
- Transfer the exported project to the other Mac.
- Import the project in Music Practice Mate to continue your practice.
Project export/import is different from exporting a finished audio mix. Use project transfer when you want to continue editing and practicing on another device.
Getting Started
- Open Music Practice Mate.
- Load an audio file using the application's file-opening control, or drag the file into the main window.
- If you want to use stem separation, load a compatible Core ML model through Preferences. This step is optional. Learn more
- Choose your audio output in the device controls, then press Space to start playback.
- Adjust speed, enable a loop, or open the mixer as needed.
Your soundYour way
Playback, Looping, Speed & Transpose
Take full control of your practice with precise playback, looping, speed, pitch, and volume adjustments.
| Control | Function |
|---|---|
| Speed | Adjust playback speed from 25% to 175%. |
| Loop | Create and save up to 10 practice loops to repeat specific passages. |
| Transpose | Shift pitch by up to 12 semitones up or down. |
| Volume | Change or mute the master output. |
| Timeline | Seek to a position in the song. |
Reading the main window
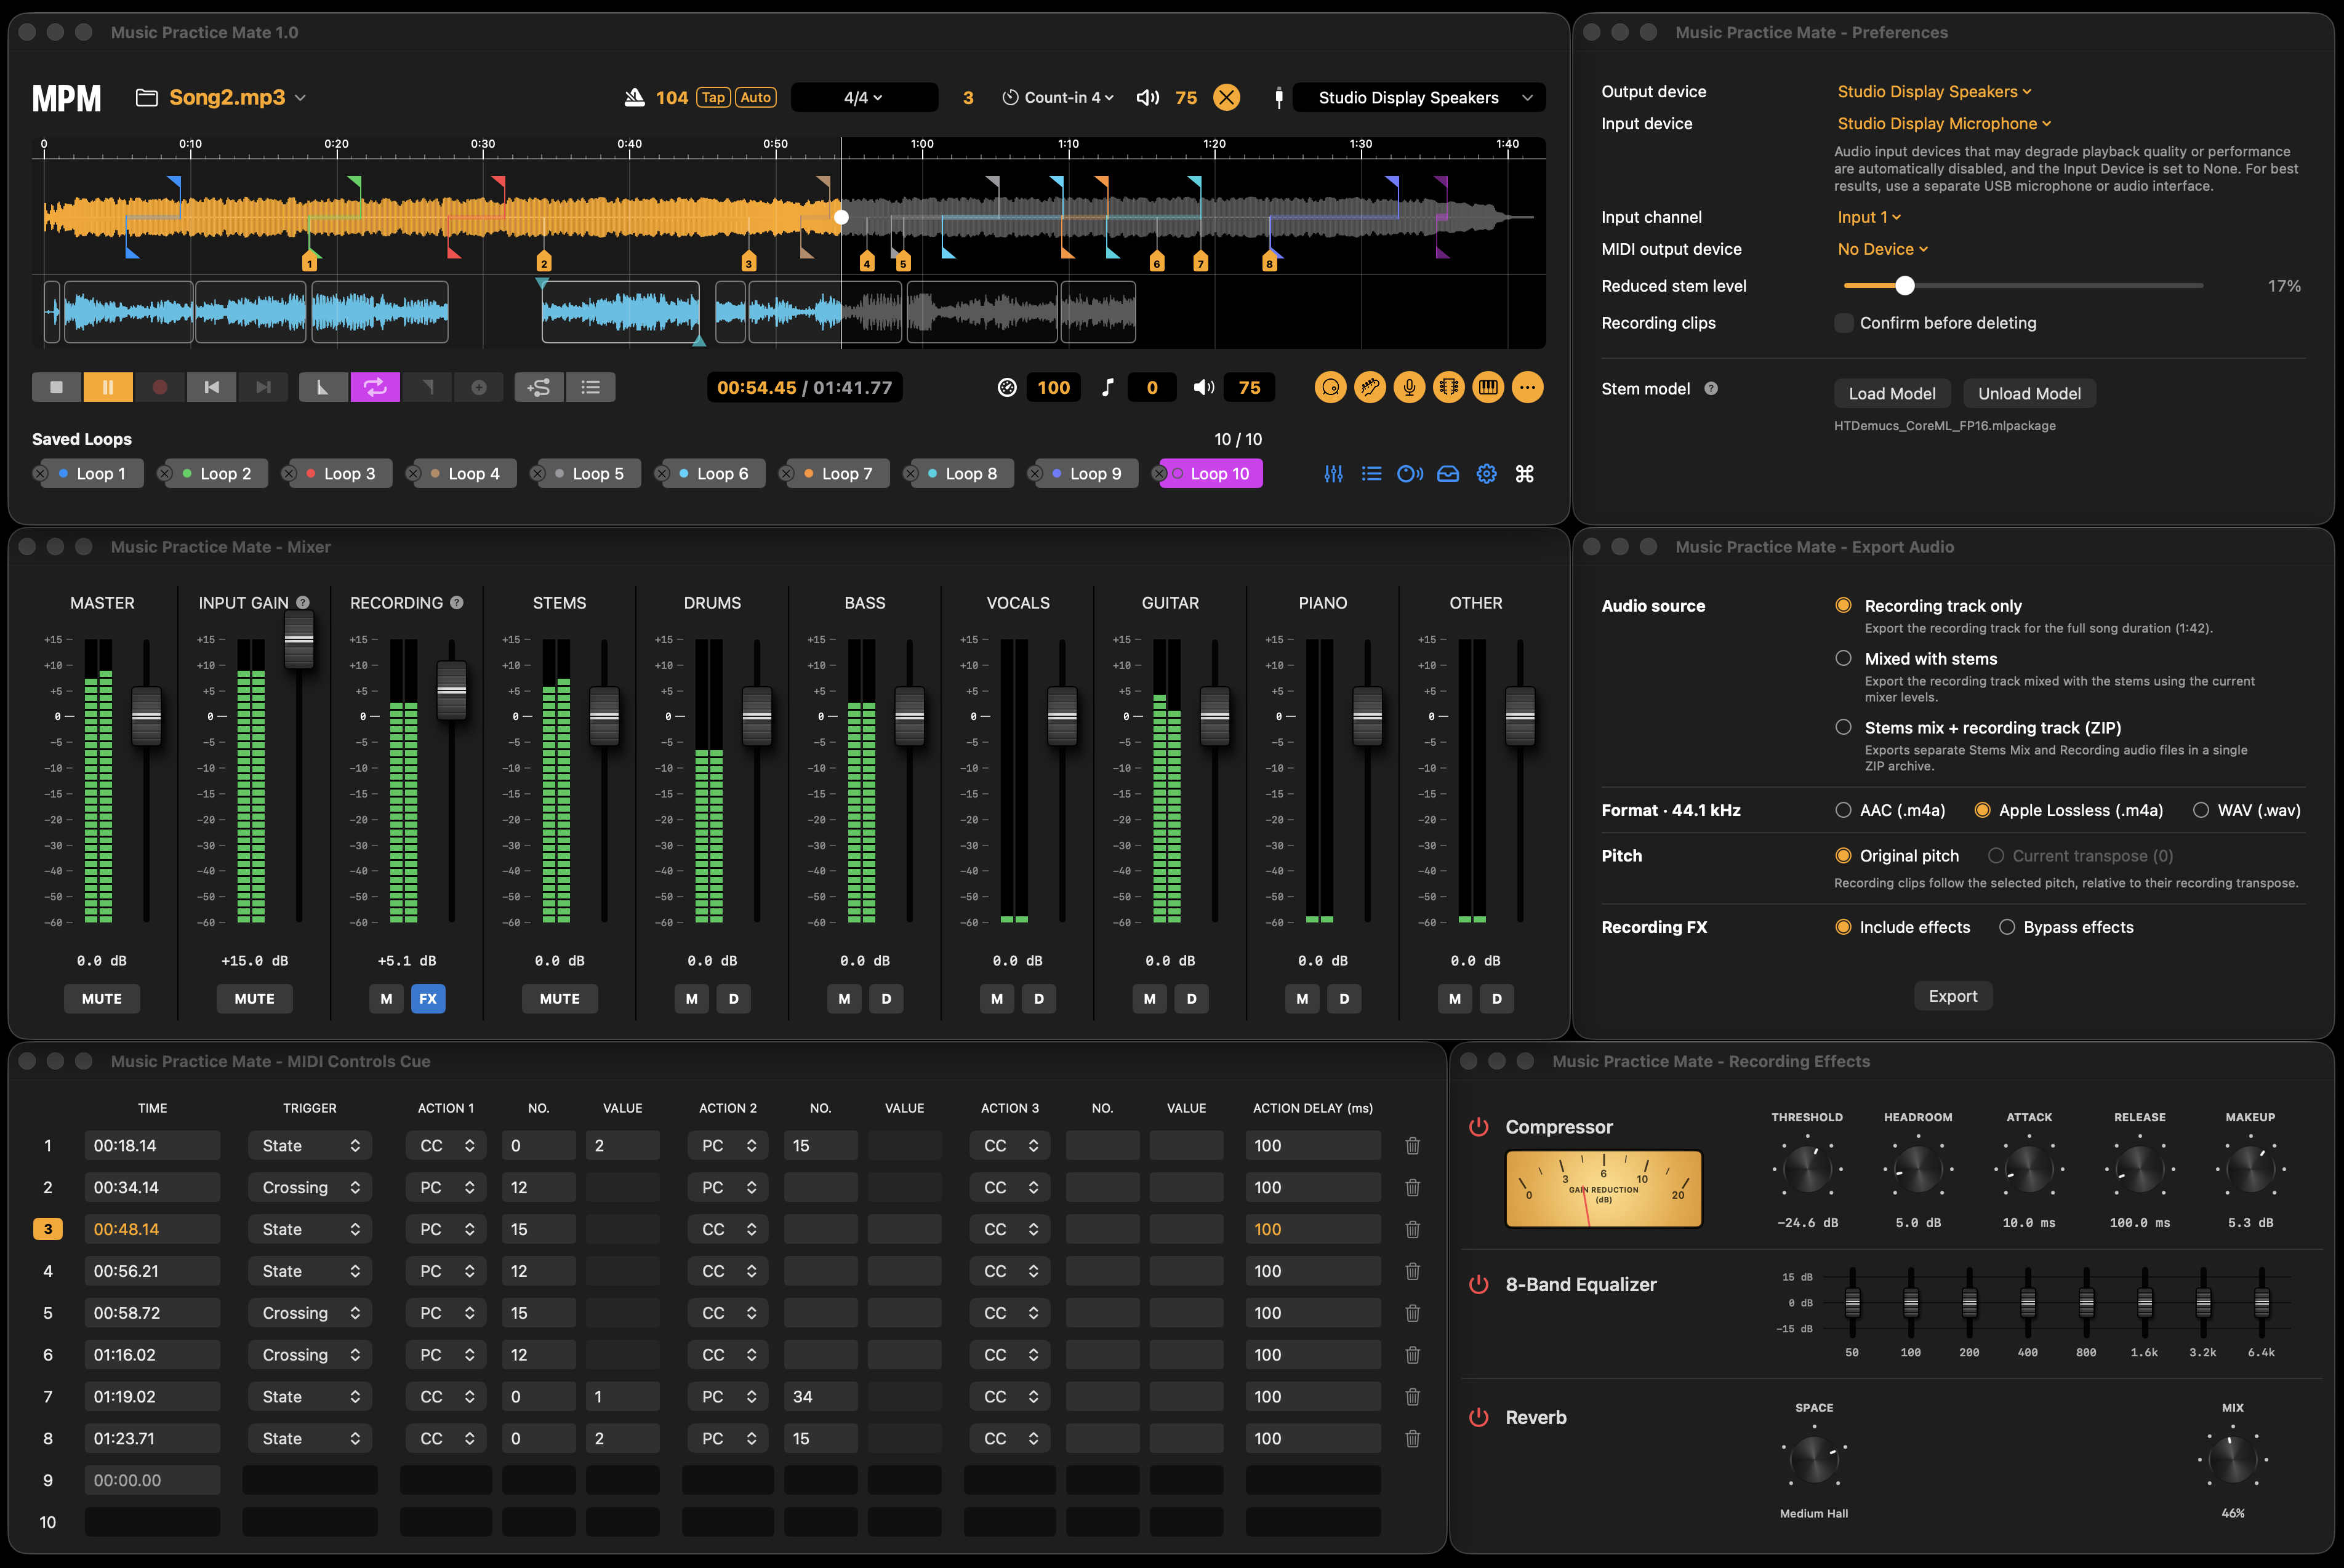
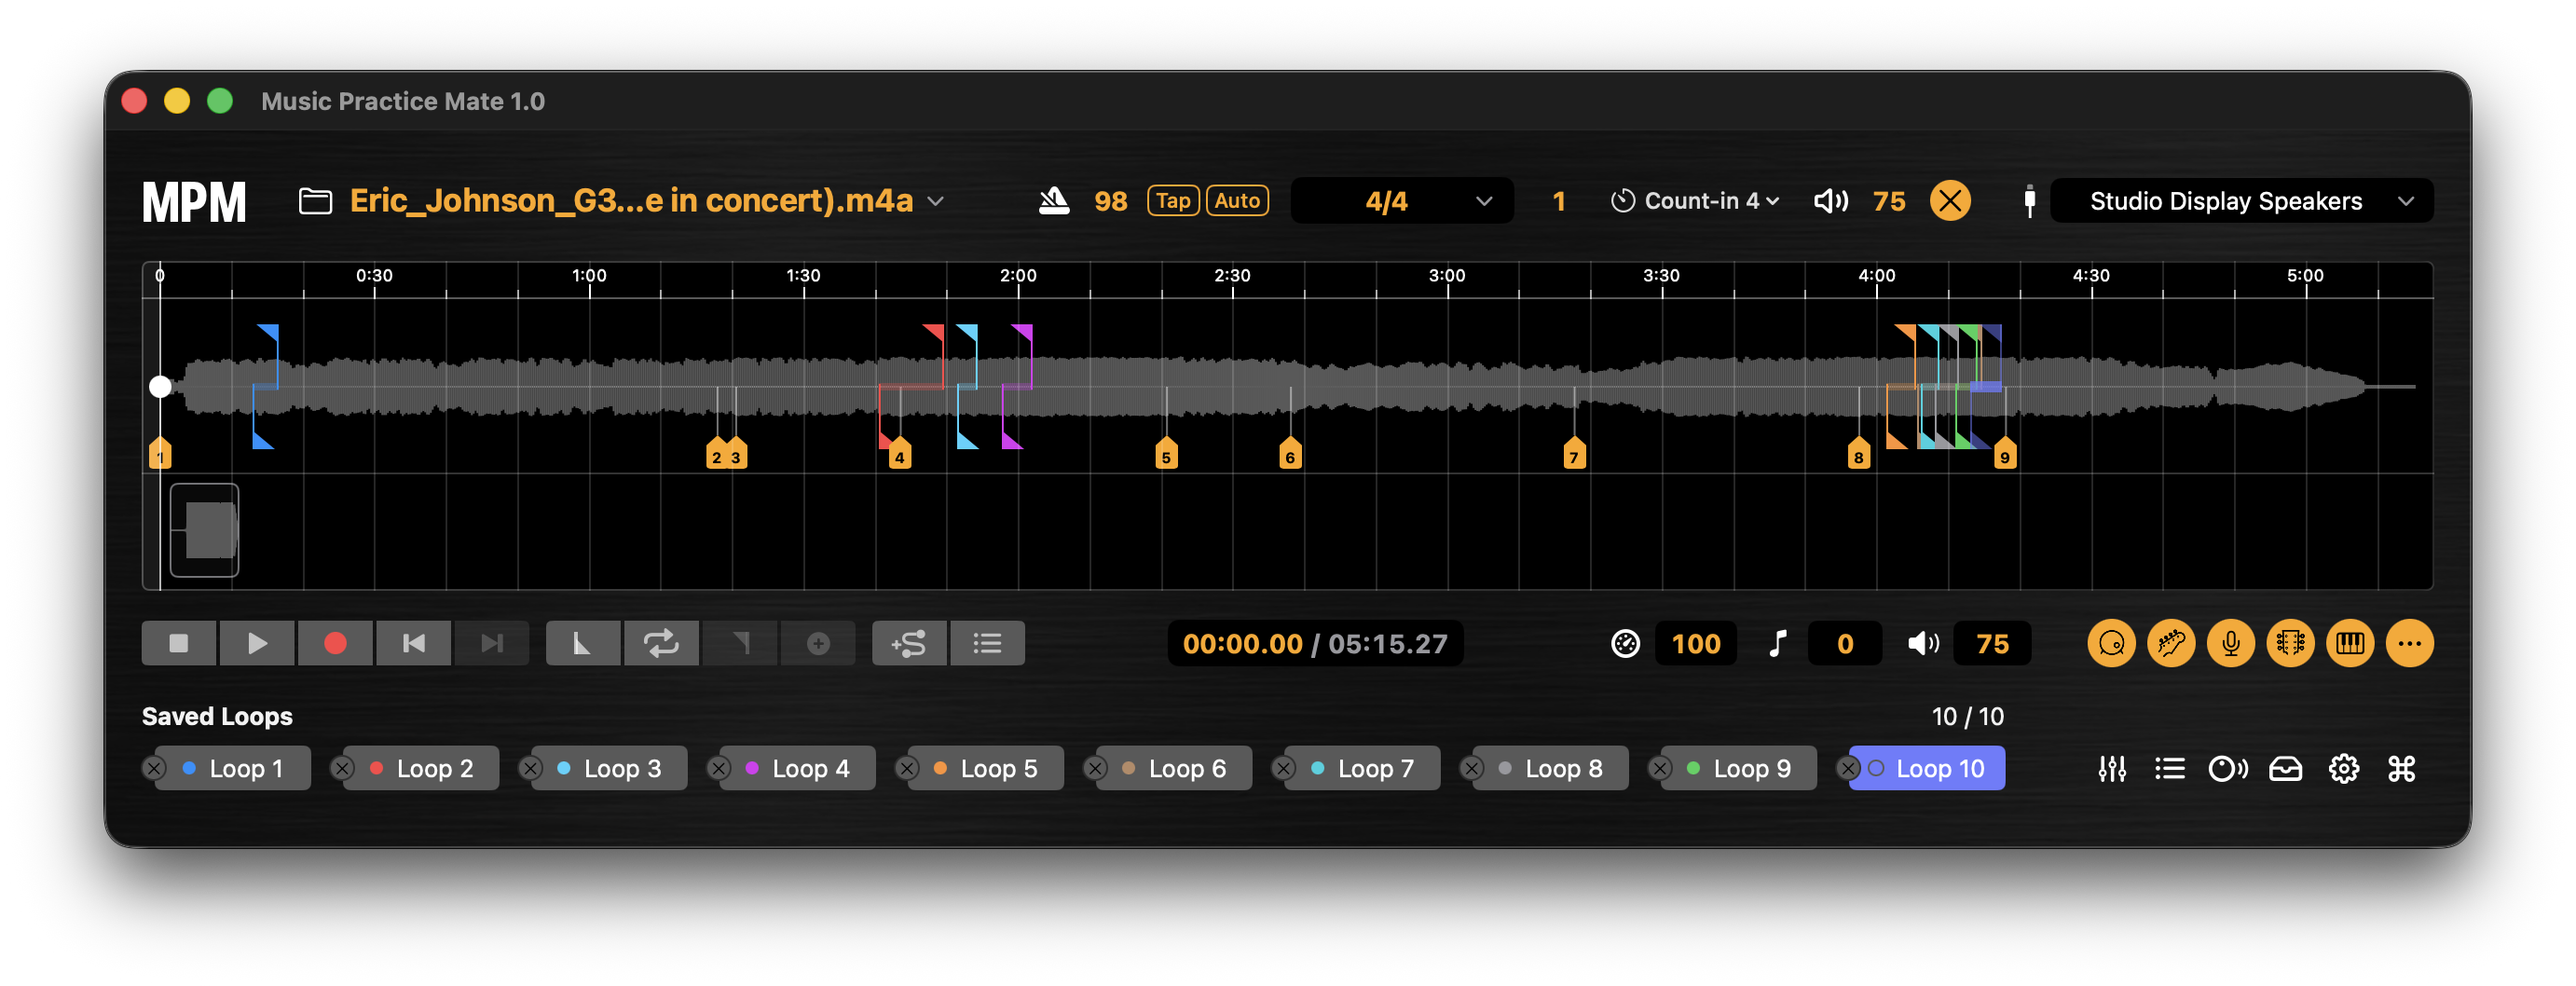
The upper timeline displays the song waveform, playhead, and colored markers for practice regions and MIDI cues. Recorded takes appear as clips in the lower track. The transport row provides playback, recording, loop, speed, pitch, and volume controls.
Practice Loops
Create and save up to 10 practice loops to repeatedly work on specific passages.
- Seek to the desired loop start and press [.
- Seek to the desired loop end and press ].
- Fine-tune the start and end points using keyboard shortcuts or by dragging the loop markers on the timeline.
- Press Return to toggle loop playback on or off.
- Use number keys 1 through 9 and 0 to select any of the 10 saved loops.
Press = or + to add a new loop. Use , and . to navigate between loops, or select a specific loop directly using the number keys.
Shape the sound
Stem Separation & Mixer
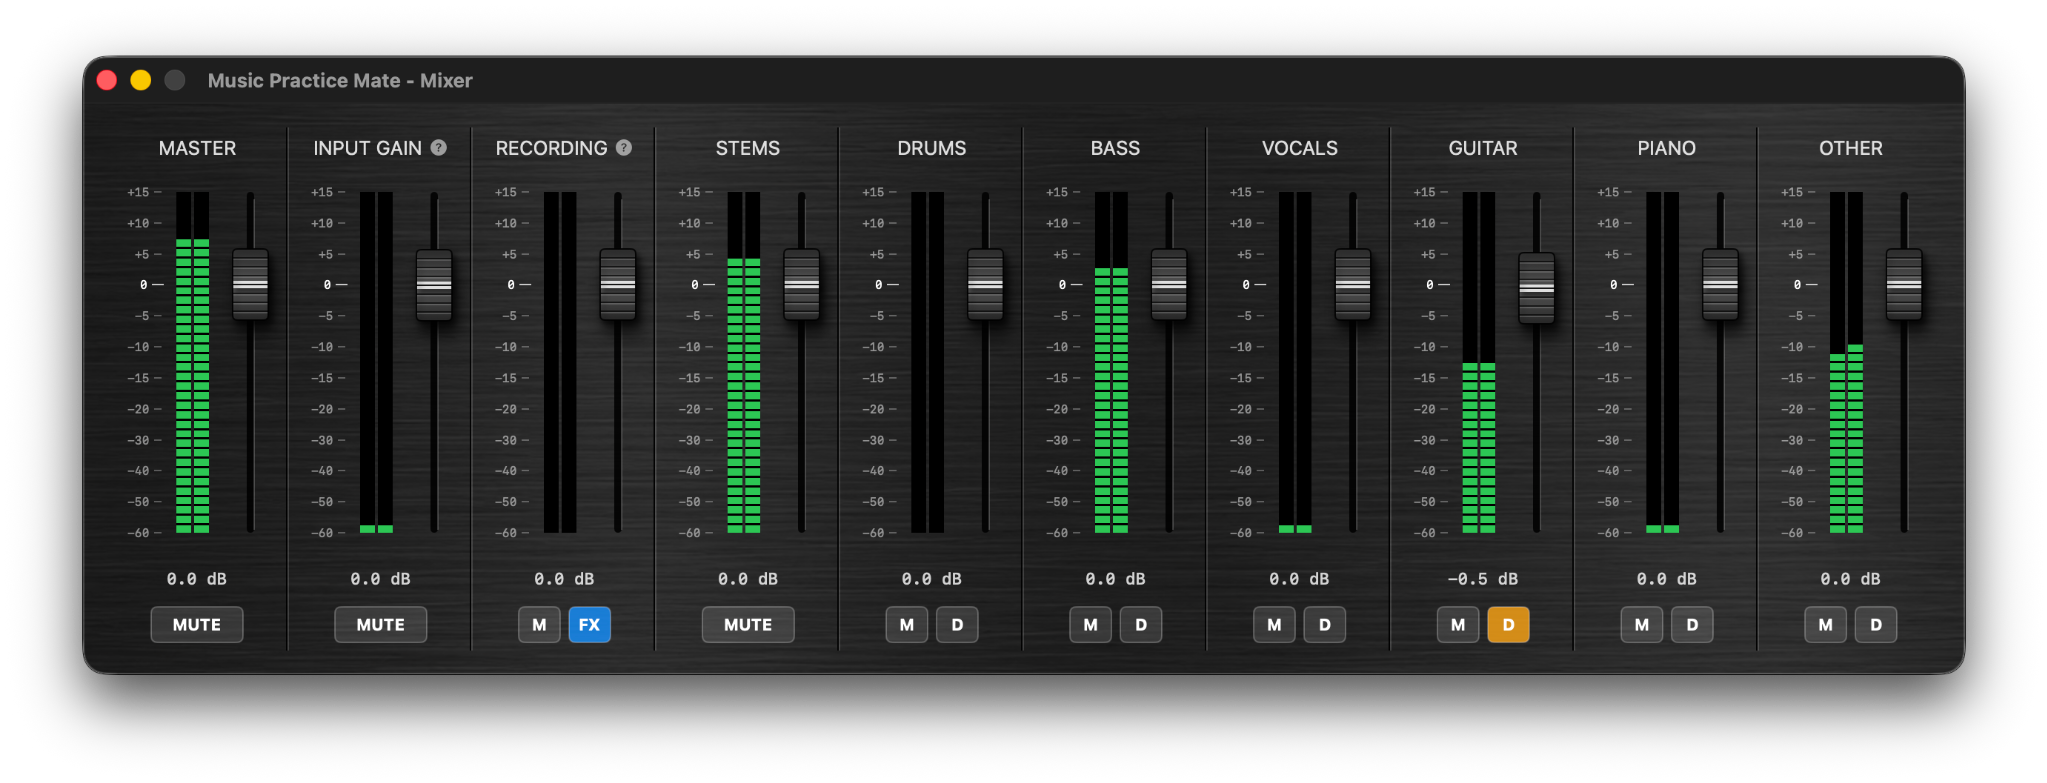
Music Practice Mate supports six-stem audio separation using a user-provided Core ML model. To enable separation, create a compatible model using the independent tutorial at Kurtzford Audio, then load the generated model through Preferences. No model is included with the app. Learn more
Once the stems are available, use the Mixer to adjust individual levels, mute instruments, and control the overall mix. The Mixer can also be used for recording and input-level adjustments without separated stems.
Using the Mixer
- Open the Mixer window from the main player.
- When separated stems are available, use each channel fader to balance the six stems.
- Select M to mute a stem or D to reduce its level. The reduced level is configured in Preferences.
- Use the STEMS fader for the overall backing-track level, and RECORDING for the recorded performance.
- Use INPUT GAIN to adjust the incoming audio signal when needed.
The visible meter activity reflects the current playback or input signal. Stem separation quality varies with the original recording.
Audio Input & Output Devices
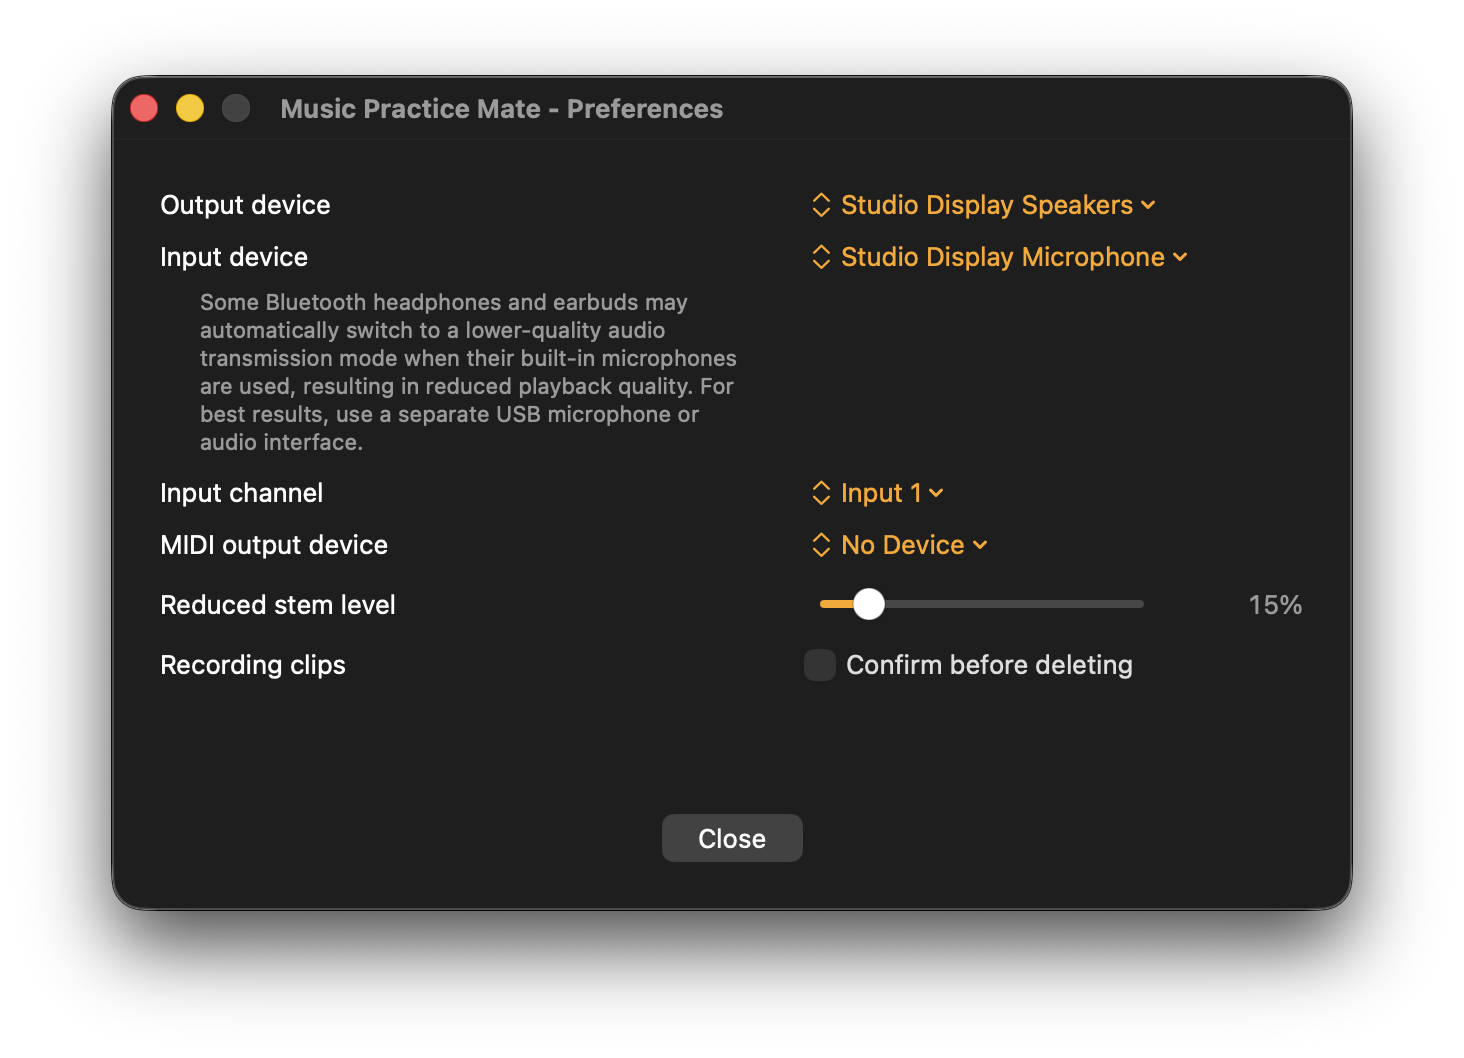
Select the output device you want to hear through, such as built-in speakers, headphones, or a compatible USB audio interface. Choose a recording input separately, or select None when you do not intend to record.
Available input channels depend on the connected audio interface. Wired monitoring is generally preferable for latency-sensitive practice.
Connection Examples
Simple playback

Practice & recording with multi-effect processor

Practice & recording with MIDI keyboard

Practice & recording with audio interface

Practice & recording with Mic’d guitar amp

Example audio and MIDI connections for different practice setups. Actual connections depend on the capabilities of your equipment.
Configure your devices
- Open Preferences and select an Output device for playback.
- Select an Input device and the appropriate mono or stereo Input channel for recording.
- Select the connected MIDI output device separately when using MIDI cues.
- Set Reduced stem level to control how quiet a stem becomes when reduced.
Audio input/output and MIDI output are independent selections. A device may provide one capability without the others.
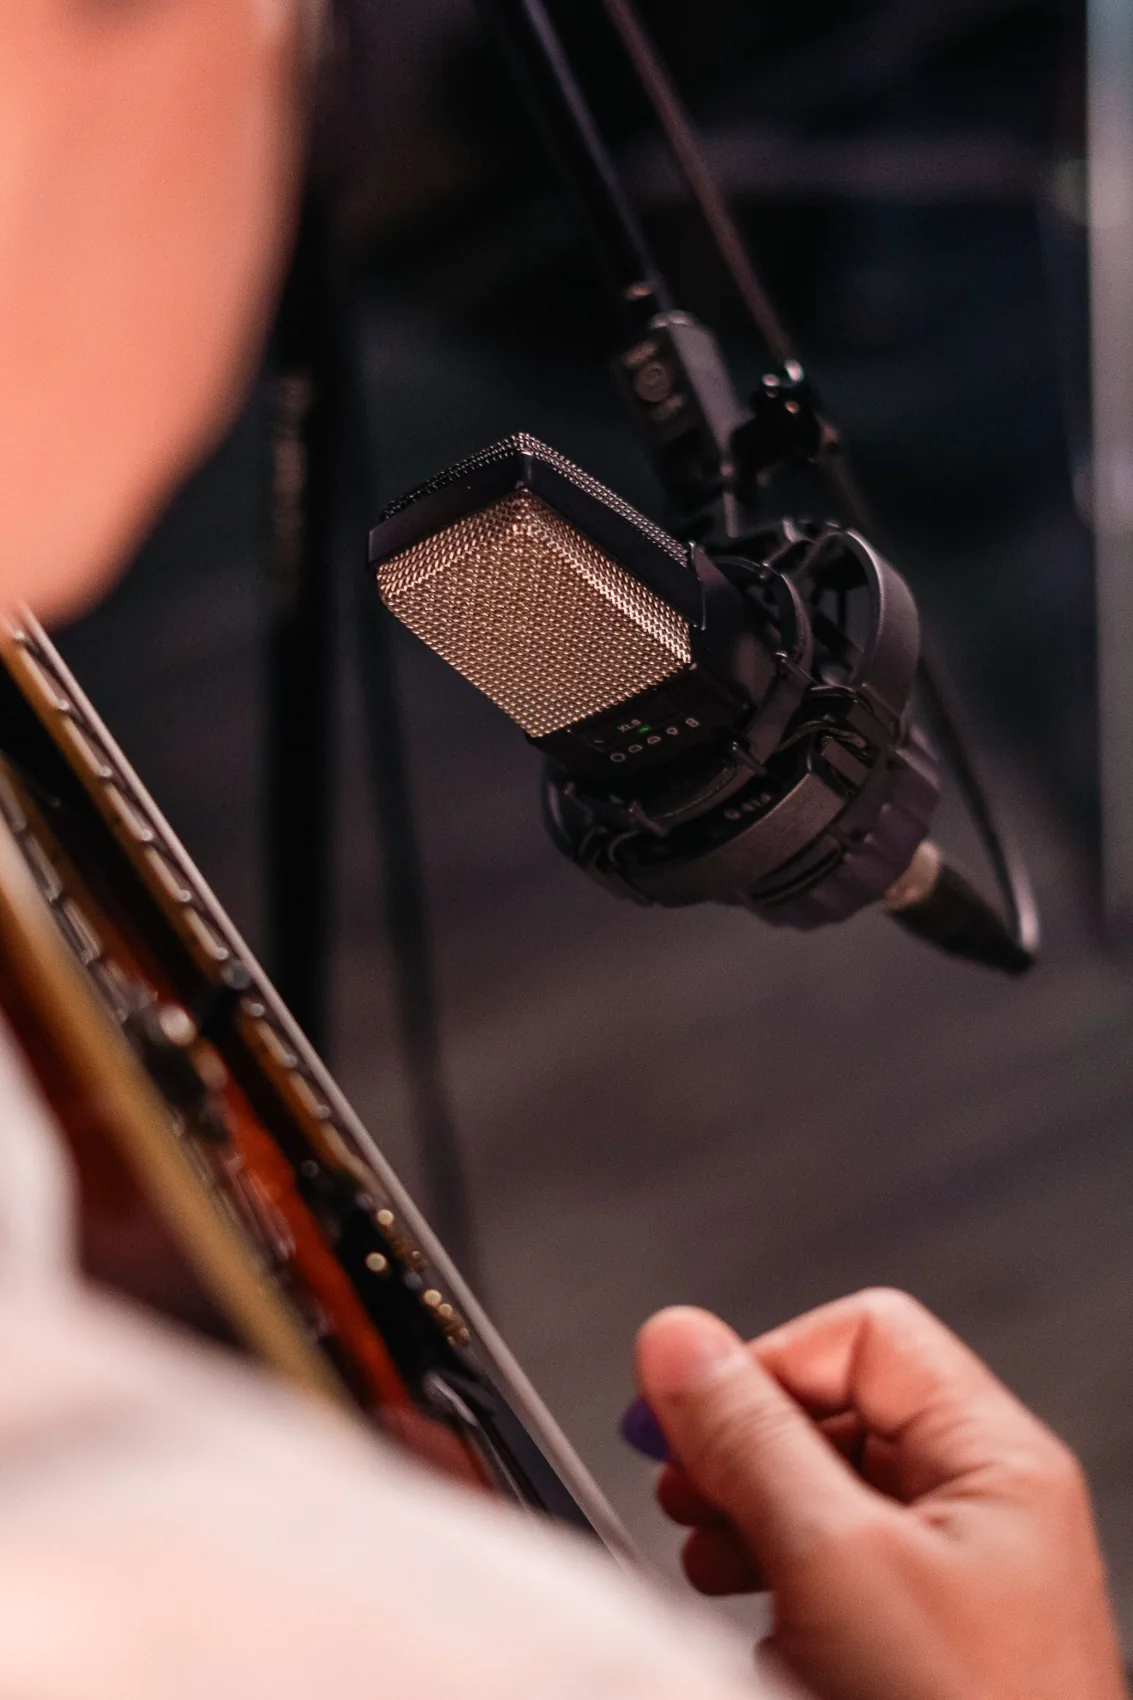
From practice to performance
Recording
Record performances through a selected input device and manage takes on the timeline. Input monitoring lets you hear the incoming signal while playing.
Music Practice Mate uses proprietary latency compensation technology designed to help align recorded performances with the backing music.
Working with takes
Recorded clips appear on the lower timeline beneath the backing waveform. You can review, mute, and remove clips as you refine your performance. The Mixer controls the recording level independently from the separated stems.
Recording Effects
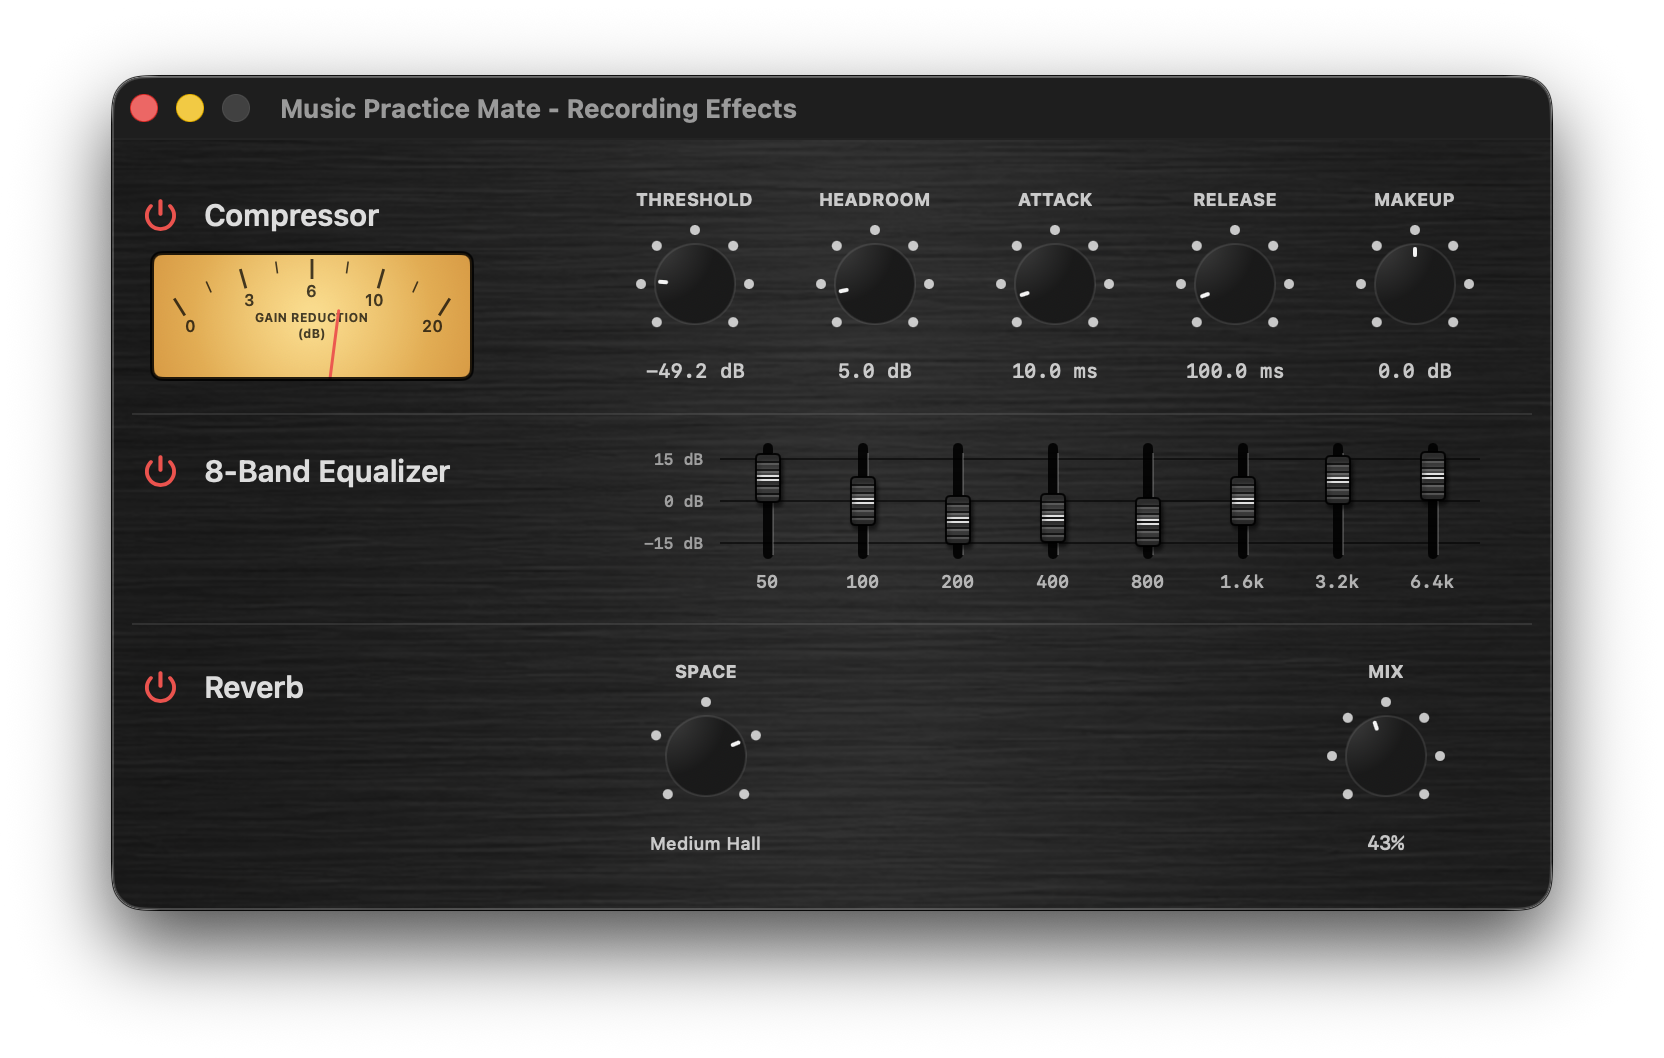
The recording track includes a compressor, eight-band equalizer, and reverb. Each effect can be bypassed separately, and the overall effects rack can be switched on or off.
| Effect | Purpose |
|---|---|
| Compressor | Controls recording dynamics and provides gain-reduction feedback. |
| Equalizer | Adjusts tone across eight frequency bands. |
| Reverb | Adds a sense of acoustic space. |
Adjusting recording effects
Use the compressor controls for threshold, headroom, attack, release, and makeup gain. The gain-reduction meter provides visual feedback. Shape the recorded tone with the eight-band equalizer, then adjust the reverb space and wet/dry mix. Each processor has its own power control.
Find your rhythm
Own your sound
Metronome & Count-in
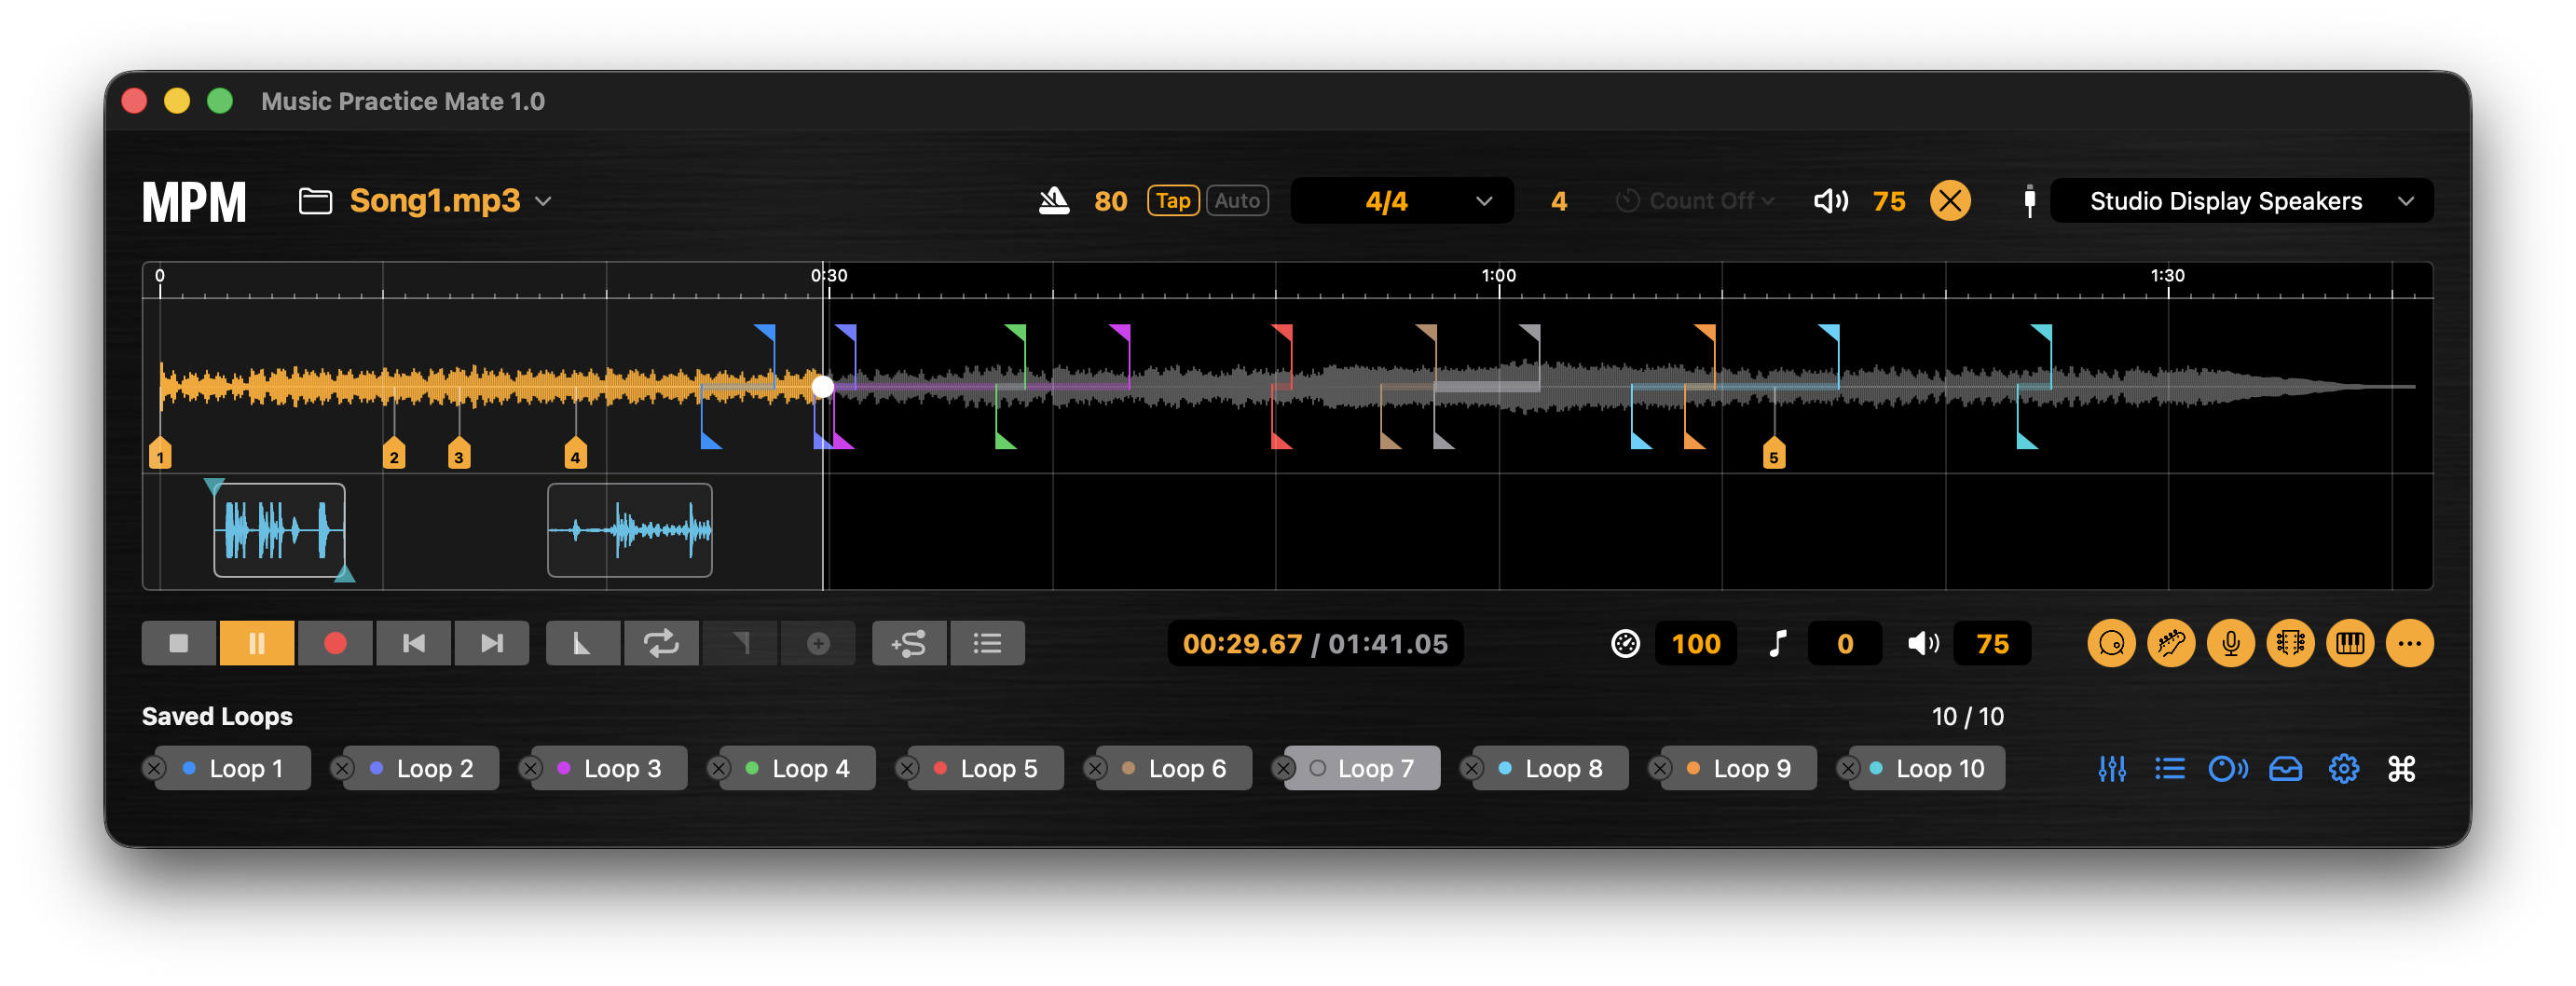
With separated drum audio and successful beat analysis, Music Practice Mate can detect the song's tempo and synchronize the metronome to its beat. Select Auto when beat detection is available. You can also set or tap a tempo manually without a Core ML model. Automatic beat synchronization and count-in are unavailable when reliable drum beat timing cannot be detected. Learn more
Your setup in sync
MIDI Controls
Software shown in the demo: The screen recording includes a third-party application (Fender® Tone Master® Pro). As Music Practice Mate sends timed MIDI commands to the connected hardware, the application displays preset changes in real time. Music Practice Mate also supports other compatible MIDI devices. Fender® and Tone Master® are registered trademarks of Fender Musical Instruments Corporation. Music Practice Mate is an independent application and is not affiliated with, endorsed by, or sponsored by Fender Musical Instruments Corporation.
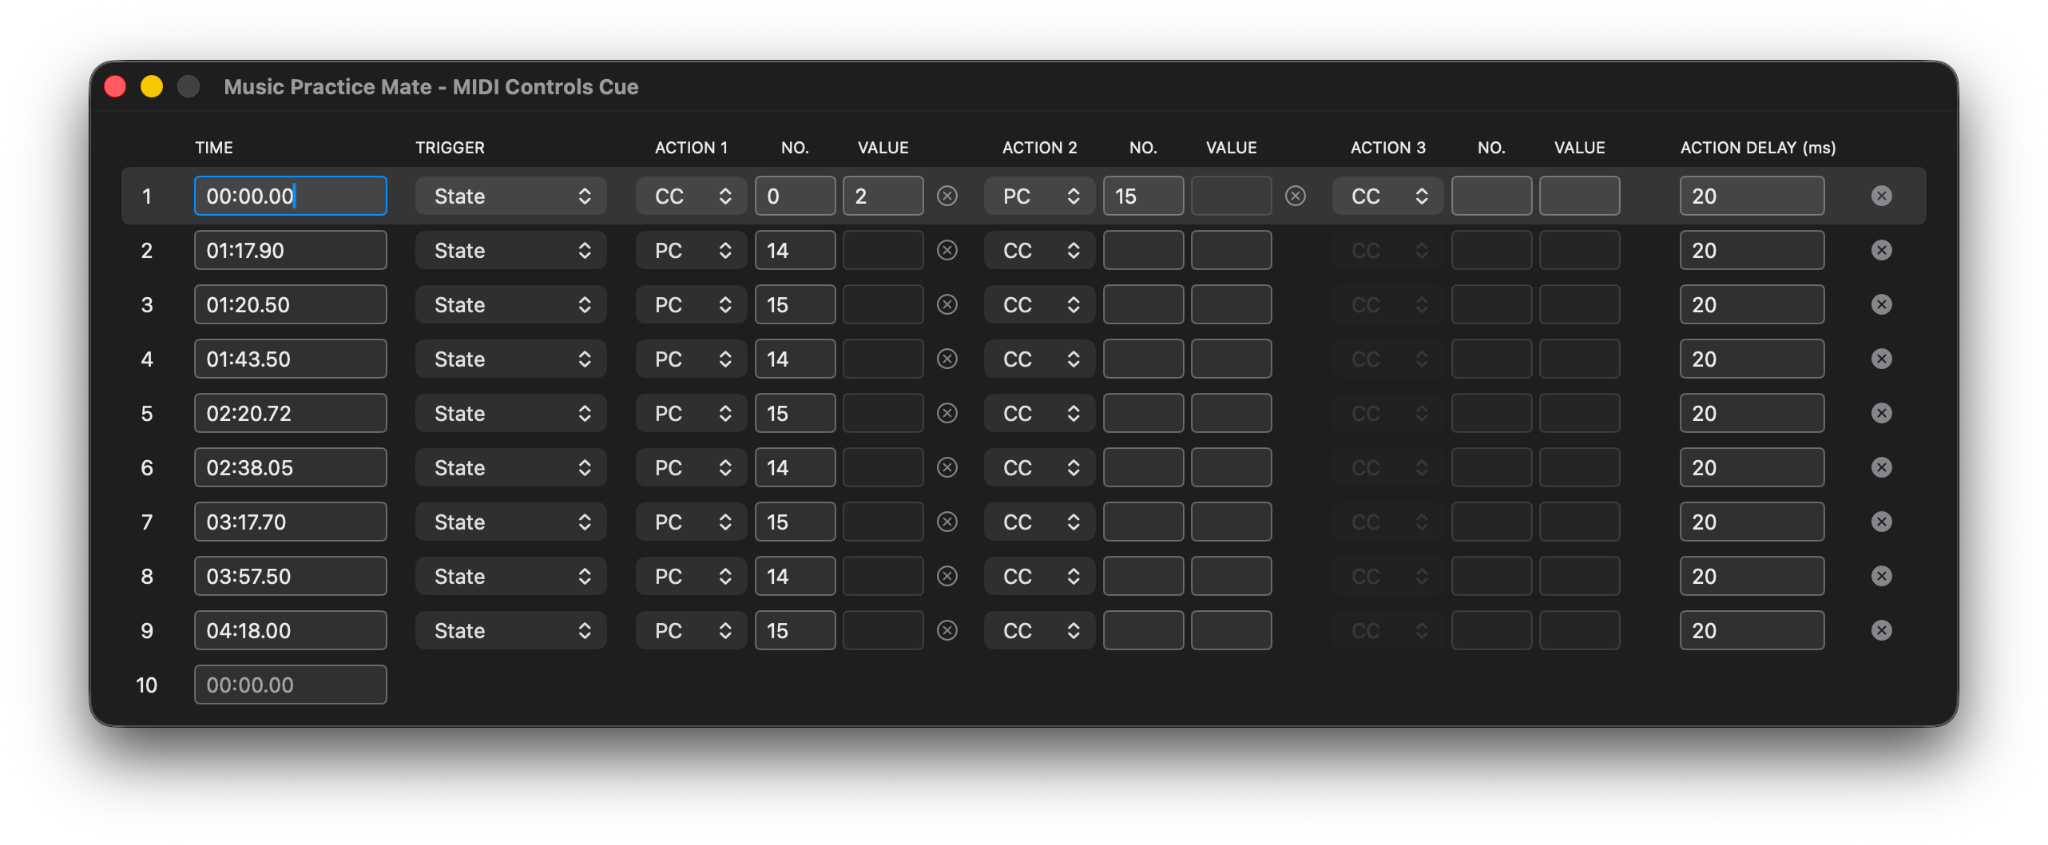
Use the MIDI Controls window to program combinations of MIDI Program Change (PC) and Control Change (CC) commands at specific points on the song timeline. During playback, Music Practice Mate sends the programmed commands to a selected USB-connected MIDI device, allowing compatible devices to be controlled automatically at the desired times. Select the MIDI output device in Preferences. Device compatibility depends on USB MIDI support, MIDI channel settings, and the commands recognized by the device. MIDI cues can be added up to the supported cue limit.
Add MIDI cues at the exact moments you want, then freely adjust their timing and actions to automate your gear as the song progresses.
Program a MIDI cue
- Connect a compatible MIDI device and choose it under Preferences → MIDI output device.
- Open MIDI Controls Cue and add a cue at the desired song time.
- Set the Trigger mode, then configure Action 1, Action 2, and optionally Action 3.
- For each action, select PC or CC. Enter the command number and, for CC, its value.
- Use Action Delay (ms) to space the actions when required by the receiving device.
- Play the song to execute cues at their programmed timeline positions.
MIDI cues send commands to the selected compatible output device. The screenshot illustrates cue configuration, not guaranteed compatibility with every USB-connected device.
Exporting Audio
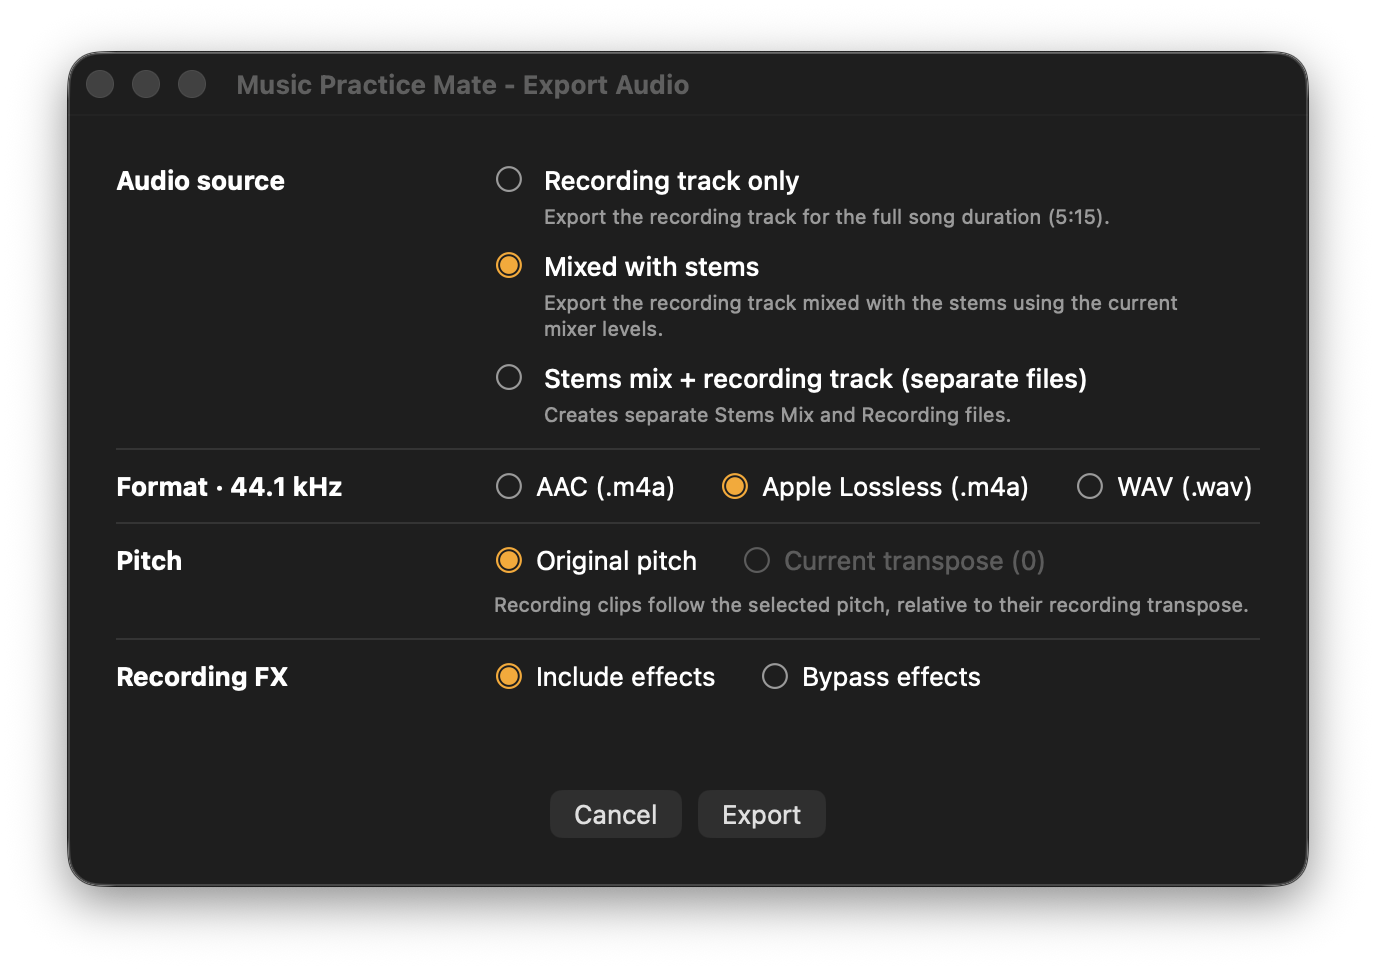
Export your recorded performance by itself, combined with the backing stems, or as separate files. Bring your recordings into a digital audio workstation (DAW) for more detailed editing and mixing, share performances with bandmates and collaborators, or send practice recordings to teachers and students for feedback.
| Setting | Choices |
|---|---|
| Audio source | Recording track only; Mixed with stems (requires separated stems); Stems mix + recording track (separate files, requires separated stems). Learn more |
| Format | AAC (.m4a); Apple Lossless (.m4a); WAV (.wav) |
| Pitch | Original pitch; Current transpose, when available |
| Recording FX | Include effects; Bypass effects |
- Open Export Audio.
- Choose the audio source and output format.
- Choose the pitch and whether to include recording effects.
- Click Export and select the destination.
Keyboard Shortcuts
Control nearly every feature with keyboard shortcuts, minimize mouse interactions, and stay focused on your music for a faster, smoother, and more intuitive practice experience.
| Shortcut | Action |
|---|---|
| Space | Play / Pause |
| Esc | Stop |
| ← / → | Seek backward / forward 2 seconds |
| Shift + ← / → | Seek 5 seconds |
| ↑ / ↓ | Adjust master volume |
| Return | Toggle loop |
| R | Record |
| A | Add MIDI cue |
| Tab | Tap tempo |
| [ / ] | Set loop start / end |
| 1 to 9, 0 | Select loop |
| ⌘ + ↑ / ↓ | Increase / decrease speed |
For the full current shortcut set, open the Keyboard Shortcuts window in Music Practice Mate.
Troubleshooting
No sound
Confirm the selected output device, master volume, and mute settings. Check whether your external interface is connected and available to macOS.
Cannot record
Verify that an input device other than None is selected, the desired channel is available, and microphone permission is granted if macOS requests it. Recording is disabled while a practice loop is active.
Recording sounds out of sync
Check the selected audio device. Bluetooth playback devices may introduce noticeable monitoring delay.
Separated stems are not available
Check that a compatible Core ML model has been loaded through Preferences. If separation is in progress, allow it to finish. Stem controls become available once separated audio has been generated or loaded from an existing project. Learn more
MIDI commands are not working
Verify that the external device supports receiving MIDI commands from a computer via USB. Ensure that the MIDI Program Change (PC) and Control Change (CC) commands are configured correctly according to the device's MIDI implementation specifications.
Input gain does not affect monitoring volume
The Input Gain fader adjusts the level of the signal being recorded, not the monitoring volume. This is expected behavior. To change the monitored input level, adjust the volume or output level directly on the input device.

Music Practice Mate supports Core ML-powered stem separation, allowing you to isolate instruments, customize your backing tracks, and unlock automatic beat detection when a separated drum track is available. Creating your own compatible Core ML model is easier than you might think. By following a publicly available step-by-step tutorial, you can have a working model ready in approximately 30 minutes.
What Is a Core ML Model?
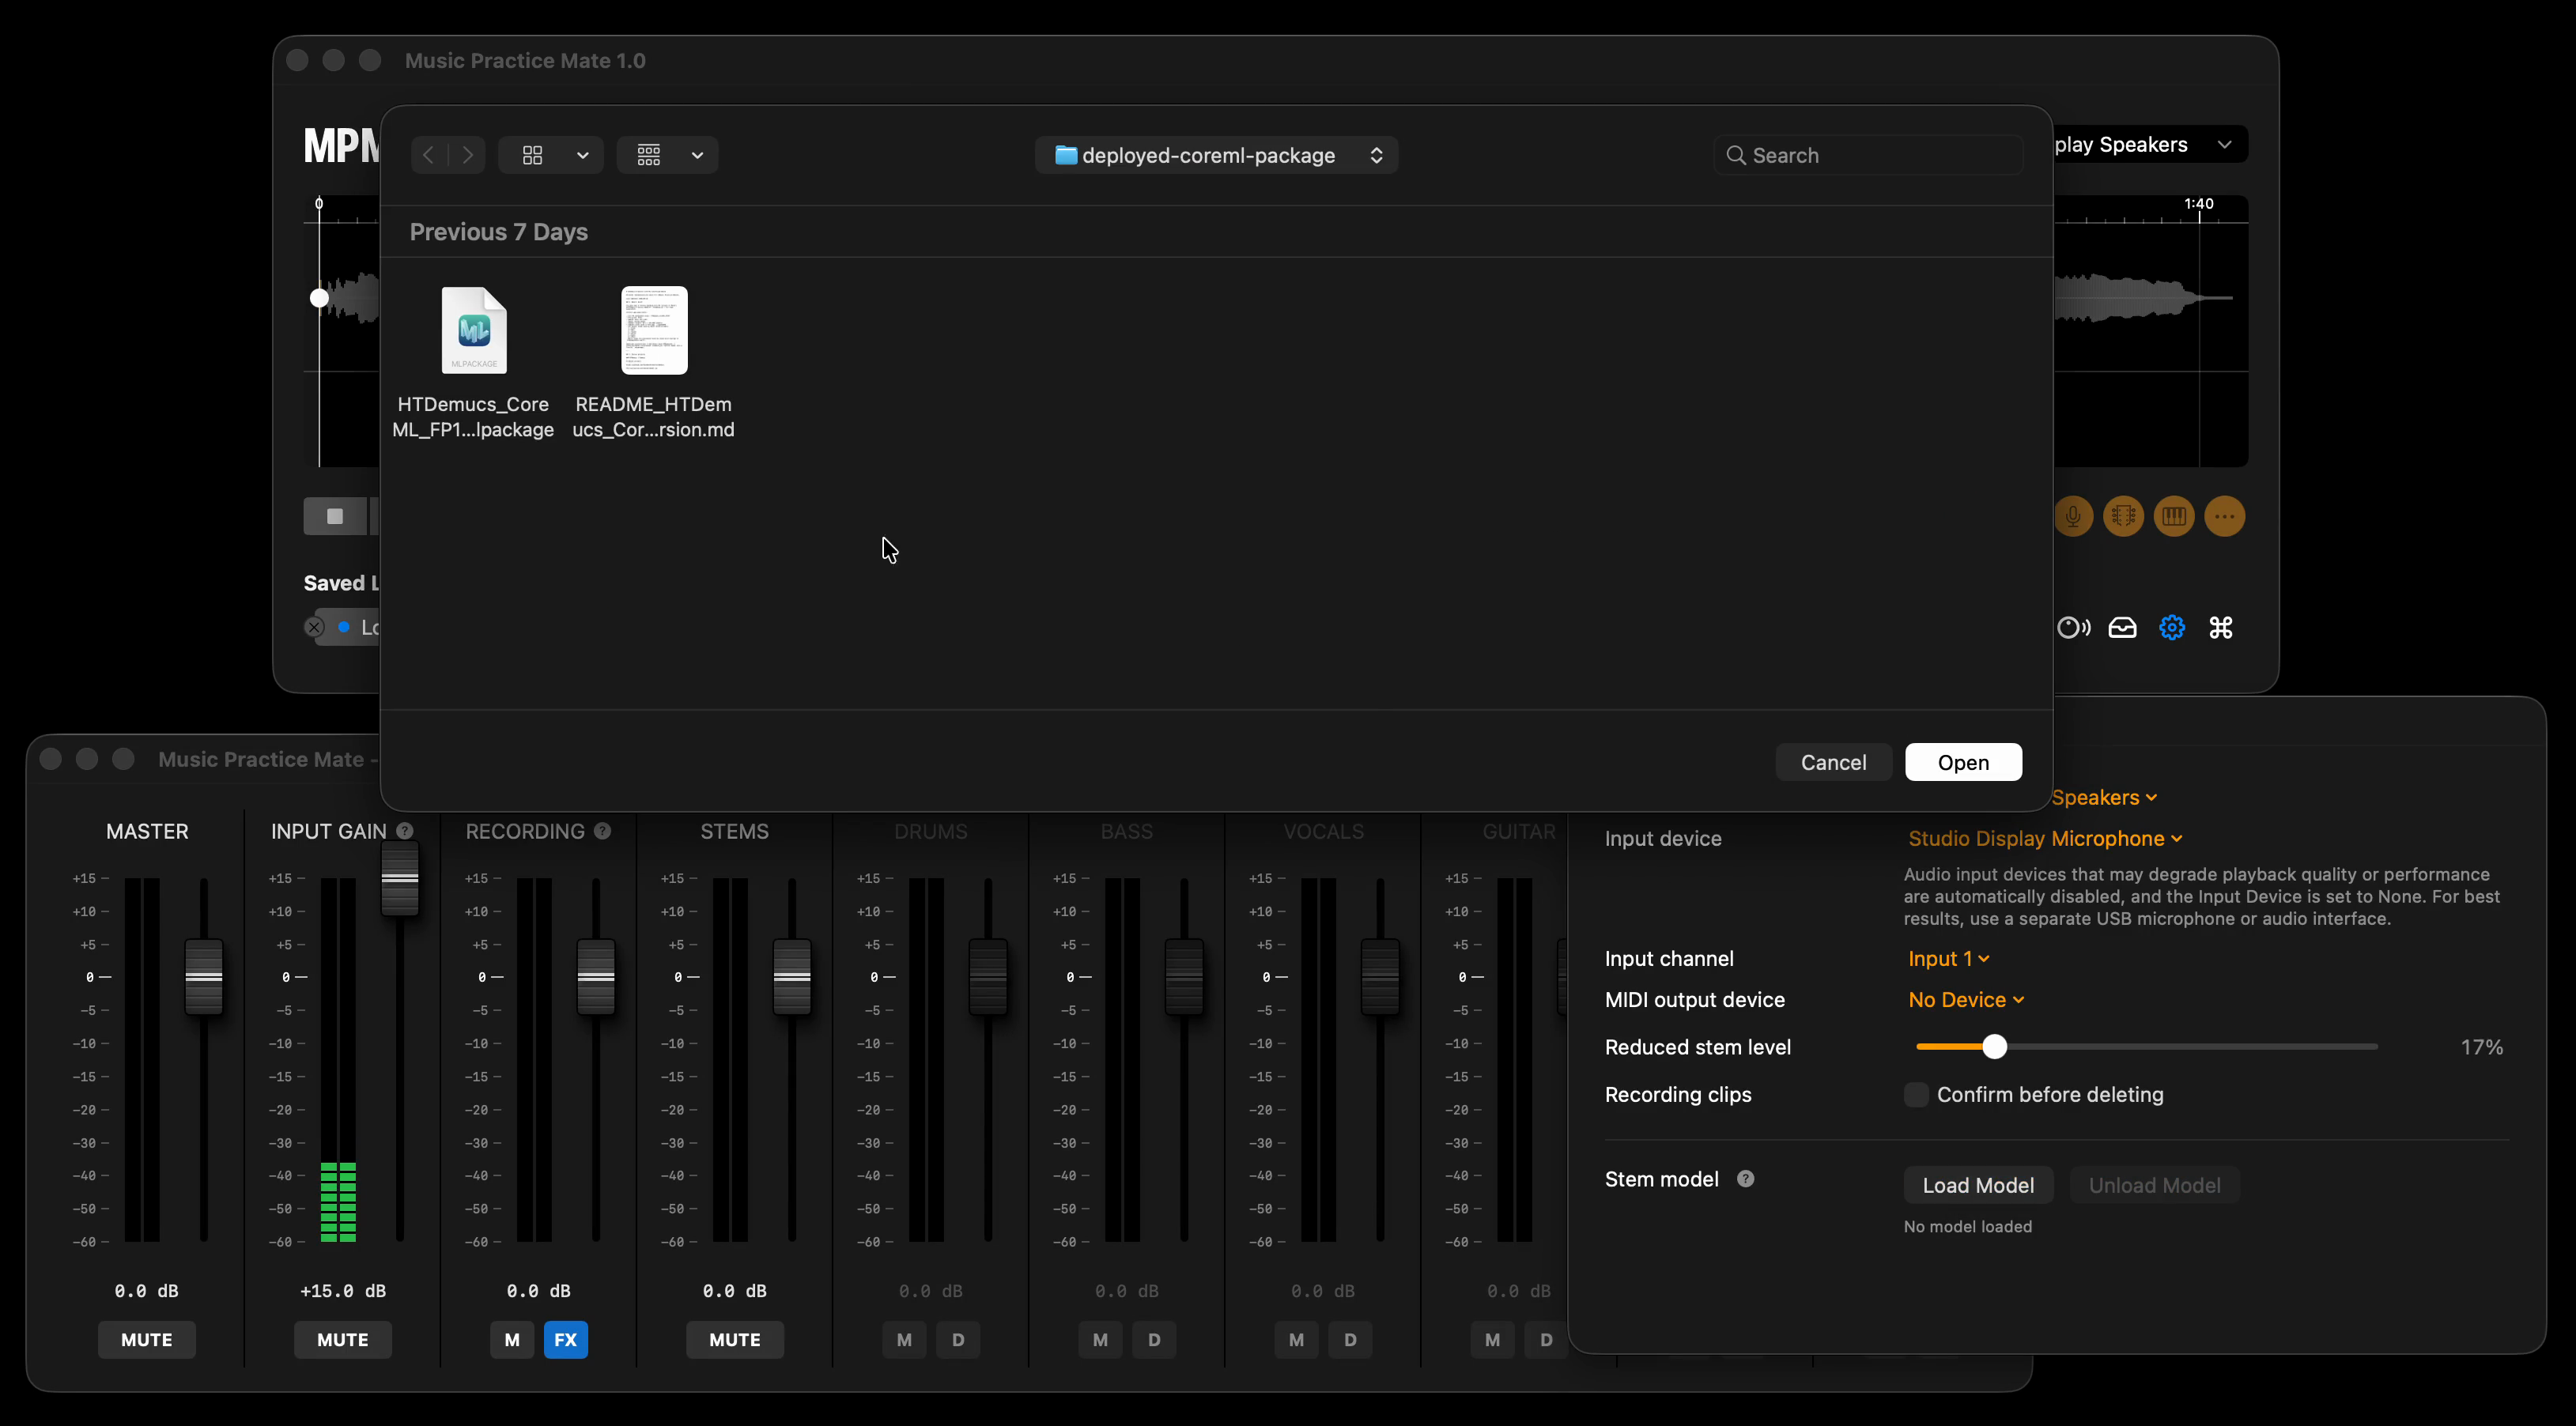
Core ML is Apple's machine learning framework that enables AI models to run locally on your Mac. Music Practice Mate uses a compatible, user-provided Core ML model to separate music into six instrument stems: drums, bass, vocals, guitar, piano, and other sounds. Once loaded, the model unlocks powerful features that give you greater control over your music practice, from creating personalized backing tracks to automatically detecting beats and synchronizing your metronome.
What Can I Do With or Without a Model?
| Feature | Without a model | With a compatible model |
|---|---|---|
| Playback, speed & pitch control | Available | Available |
| Practice loops | Available | Available |
| Recording & recording effects | Available | Available |
| Manual metronome & tap tempo | Available | Available |
| MIDI automation | Available | Available |
| Project management | Available | Available |
| Recording-only audio export | Available | Available |
| Generate new six-stem tracks | Not available | Available |
| Individual stem mixing & stem-based export | Available with previously generated stems | Available after separation |
| Automatic beat detection & synchronized count-in | Available with existing drum stems and successful beat analysis | Available when drum-stem beat analysis succeeds |
You do not need to keep a model loaded to reuse stems that have already been generated and saved. Automatic beat features depend on successful drum-stem analysis, not simply on loading a model.
Compatible Model Specifications
The following is the format produced by the Kurtzford Audio six-stem tutorial and used by Music Practice Mate for separation.
| Setting | Required format |
|---|---|
| Package | Core ML .mlpackage (HTDemucs 6-stem FP16 conversion) |
| Input | audio, Float32, [1, 2, 441000] |
| Output | sources, Float16, [1, 6, 2, 441000] |
| Audio format | 44.1 kHz, stereo, 10-second segments |
| Stem order | drums, bass, vocals, guitar, piano, other |
| Target | macOS 13 or later |
Music Practice Mate processes longer songs automatically. The numbers above describe the model interface, not a limit on the length of the song you can practice.
Create a Compatible Model
Want to unlock six-stem separation? It is easier than you might think! The step-by-step guide at Kurtzford Audio* shows you how to convert a pretrained HTDemucs six-stem model into a compatible Core ML package, verify its input and output specifications, and test the results. No coding skills, AI background, or model training from scratch required. Just follow the instructions and unlock even more of what Music Practice Mate can do!
Once your model is ready, load the .mlpackage in Preferences and start
separating songs to build your own practice mixes.
Follow the Core ML Model Tutorial
*Kurtzford Audio is an independent educational resource.